Learning how to play the E chord on guitar is a fundamental step for every guitarist.
This chord is one of the easiest to master and serves as a building block for countless songs across various genres.
Whether you’re strumming along to pop, rock, or country tunes, the E chord will often be part of your musical journey.

In this guide, you will discover useful tips for fingering techniques and hand positions that make playing the E chord more comfortable.
You will also find out about different strumming patterns that can help you bring the chord to life in your music.
With practice and dedication, you’ll be able to seamlessly incorporate the E chord into your playing.
By the end of this article, you’ll feel confident in your ability to play the E chord and explore its many variations.
So grab your guitar, and let’s dive in!
Key Takeaways
- The E chord is easy to learn and versatile for many music styles.
- Proper hand position and finger placement are key for playing the E chord comfortably.
- Practice different strumming patterns to enhance your musical expression.
Getting to Know the E Chord
The E chord is a fundamental building block for many songs.
Understanding its variations and the E major scale will help you play better.
Understanding the E Major Scale
The E major scale consists of the notes E, F#, G#, A, B, C#, and D#.
This scale is important because it forms the basis for many melodies and harmonies.
When you play the E chord, you are using a triad made up of the root (E), the major third (G#), and the perfect fifth (B).
You might also explore inversions, like playing the G# or B as the lowest note.
This can add a different sound and feel to your music.
Practicing the scale will help you recognize how these notes fit together in various songs.
Differences Between E Major, E Minor, and E7
The E major chord is bright and happy, while the E minor chord has a more mellow, sad sound.
When you play E major, you’re using the notes E, G#, and B. In contrast, E minor uses E, G, and B. Notice that changing from G# to G makes a big difference!
The E7 chord adds tension and color to your playing.
It includes E, G#, B, and D. This creates a unique sound that works well in blues, jazz, and rock music.
Learning these differences will allow you to express various emotions in your playing and create richer harmonies.
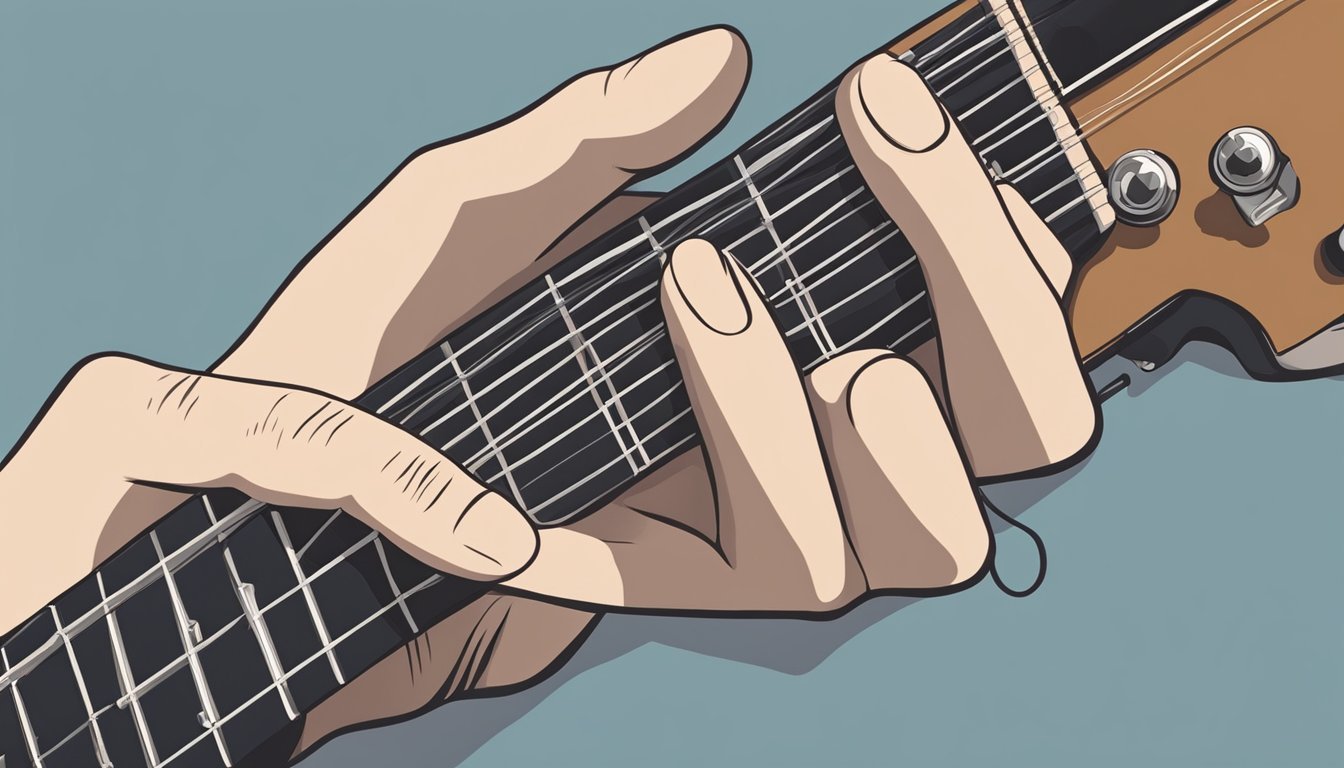
Fingering Techniques and Hand Position
Getting the right finger placement and hand position is key to mastering the E chord on the guitar.
Focusing on finger dexterity and muscle memory will help you play smoother.
This section will cover how to build your skills with important techniques, such as barre and power chords.
Additionally, practicing the E chord in various contexts, such as transitioning from other chords, will enhance your overall proficiency.
As you become more comfortable with finger placements, you can explore different strumming patterns to add depth to your playing.
To truly progress, it’s essential to learn basic guitar techniques that lay the groundwork for more advanced skills in the future.
Building Finger Dexterity and Muscle Memory
To play the E chord easily, start by developing your finger dexterity.
Practice simple exercises such as finger stretches and scales.
These will warm up your fingers and improve your control.
Try this exercise:
- Place your fingers on frets one through four, and lift each finger one at a time.
- Repeat this with different fret positions.
This will help with finger placement for the basic E chord.
The more you practice, the more muscle memory you’ll create.
Soon, changing chords will feel natural.
Mastering Barre Chords and Power Chords
The E barre chord is a powerful shape to learn.
Start by placing your index finger flat across all six strings at the 7th fret.
Then, use your middle, ring, and pinky fingers to shape the E chord above it.
Here’s how to form an E power chord:
- Place your index finger on the 2nd fret of the A string.
- Put your ring finger on the 4th fret of the D string.
- Add your pinky to the 4th fret of the G string.
This creates a strong sound.
Both techniques require practice, but they will expand your playing style.
Transitioning Between E Chord Shapes
Being able to transition between different E chord shapes is essential.
Start with the open E chord:
- Index on the 1st fret of the G string
- Middle on the 2nd fret of the A string
- Ring on the 2nd fret of the D string
Practice moving smoothly from the open E chord to the barre version.
Try playing the open E, then shift your fingers to the barre shape without pausing.
This will help you quickly switch between chords during songs.
Using these techniques will surely enhance your playing experience and confidence on the guitar.
Strumming Patterns and Rhythm Techniques
Getting the right strumming patterns and rhythm techniques can shape your sound when playing the E major chord.
Mastering these techniques will make your playing more dynamic and engaging.
Let’s dive into some key aspects to enhance your guitar skills.
Playing with Proper Strumming Technique
To play effectively, you want to focus on how you strum.
Use your wrist instead of your arm to keep motions relaxed.
Hold your pick firmly, but not too tight, to avoid tension.
Start with basic downstrokes, moving your hand steadily through the strings.
Next, add upstrokes after each downstroke.
A common pattern in the key of E major is down, down, up, up, down, up.
This pattern provides a nice groove.
Practice slowly, then gradually increase your speed as you get comfortable.
Finally, listen to your rhythm.
Playing along with songs will help you internalize different strumming patterns.
This practice will improve your timing and make your playing sound more cohesive.
Applying Palm Muting and String Play
Palm muting adds a nice texture to your strumming.
Lightly rest the edge of your palm on the strings near the bridge while you strum.
This technique will produce a muted sound, perfect for emphasizing certain beats or creating a more percussive feel.
Combine palm muting with regular strumming patterns for variety.
For instance, try muting the downstrokes while allowing upstrokes to ring out fully.
Additionally, experiment with string play by incorporating fingerpicking or hybrid picking.
This approach allows you to play melodies while maintaining your chord progressions.
When practicing the E chord, explore how these techniques can enhance your overall sound and rhythm.
Practicing the E Chord on Different Guitars
Practicing the E chord can vary depending on whether you’re using an acoustic or electric guitar.
Each type of guitar brings its own style and feel, which can influence how you approach playing this chord.
Acoustic Guitar Nuances
When you practice the E chord on an acoustic guitar, focus on the placement of your fingers.
Ensure that your fingers press down firmly on the strings without touching adjacent ones.
This helps produce a clean sound.
Try experimenting with different strumming patterns.
For instance, using a down-up strumming pattern can add rhythm.
Remember to keep your wrist relaxed for better control.
You might also want to practice switching between the E chord and others, like A and D. This builds your muscle memory and helps you transition smoothly.
Don’t forget to pay attention to your body posture.
Sit up straight to help improve your playing technique over time.
Electric Guitar Techniques
Playing the E chord on an electric guitar can bring a whole new vibe.
The lighter strings on most electric guitars can make it feel easier to press down your fingers.
Use a pick to create a brighter sound.
You can also explore palm muting, which changes the tone.
Lightly resting your palm on the strings near the bridge adds a cool effect to your playing.
Try different settings on your amp for varied tones.
Experiment with distortion to see how that changes the E chord sound.
Lastly, practice using your fingers to slide into the E chord from other chords.
This adds a unique flair to your playing and enhances your overall skill.
Frequently Asked Questions
If you’re getting started with the E chord on guitar, you might have some questions.
Let’s tackle some common inquiries about fingering, related chords, and playing in different keys.
What’s the fingering for an E major chord on guitar?
To play the E major chord, place your fingers as follows:
- First finger on the 1st fret of the G string (3rd string).
- Second finger on the 2nd fret of the A string (5th string).
- Third finger on the 2nd fret of the D string (4th string).
Strum all six strings for a full sound!
Can you show me how to do an E minor chord on guitar?
For an E minor chord, it’s even simpler!
- Use your second finger on the 2nd fret of the A string.
- Use your third finger on the 2nd fret of the D string.
You can strum all six strings for a rich, open sound.
Where do I place my fingers for an A major chord?
To play an A major chord, you’ll want to position your fingers like this:
- First finger on the 2nd fret of the D string (4th string).
- Second finger on the 2nd fret of the G string (3rd string).
- Third finger on the 2nd fret of the B string (2nd string).
You can strum from the A string down to the high E string.
How do I form a B chord on the six-string?
A B chord is a bit tricky since it’s a barre chord.
- You’ll want to bar all the strings at the 2nd fret using your first finger.
- Your second finger goes on the 4th fret of the G string, third finger on the 4th fret of the A string, and your fourth finger on the 4th fret of the D string.
Make sure to press down evenly for a clean sound!
What does it mean to play in the key of E?
Playing in the key of E means the main chords you use are based around E.
The common chords include E major, A major, and B major.
This key often gives songs a bright and rich sound.
Could you guide me through the E chord on a piano?
To play an E chord on piano, press down the E, G#, and B keys together.
You don’t need to use all your fingers; just aim for a comfortable position.
This simple chord gives you that uplifting sound you’re looking for!