
Learning to play the D chord on the guitar is a key step for any beginner.
With just three fingers, you can create a sound that’s bright and rich, making it a favorite for countless songs.
Mastering this chord can open the door to playing full songs and enhance your overall guitar skills.
It’s not just about finger placement; understanding the notes and practicing them with simple songs can greatly improve your confidence.
Whether you’re strumming your favorite tunes or just jamming with friends, the D chord is your ticket to joining the music.
Remember, practice is crucial.
The more you play, the easier it becomes.
Let’s dive in and get you strumming that D chord like a pro!
Key Takeaways
- The D chord is essential for beginner guitar players.
- Proper fingering techniques can make playing smoother.
- Practicing with songs helps reinforce your skills.
Getting to Know the D Chord
The D chord is a key part of many songs and a great chord for beginners.
Understanding its structure and how it fits into the D major scale can help you play and recognize it better.
Anatomy of a D Major Chord
The D major chord consists of three main notes: D, F#, and A. These notes create what is known as a D major triad.
Here’s a simple layout of how to play the D chord on the guitar:
- 1st string (high E): 2nd fret (F#)
- 2nd string (B): 3rd fret (D)
- 3rd string (G): 2nd fret (A)
- 4th string (D): open
- 5th string (A): don’t play
- 6th string (E): don’t play
When strumming, aim for the first four strings.
This helps you get that bright, clear sound that’s characteristic of the D chord.
Understanding the D Major Scale
The D major scale is essential for making music with the D chord.
It consists of seven notes: D, E, F#, G, A, B, and C#.
Here’s a quick look at how it works:
- Whole step: D to E
- Whole step: E to F#
- Half step: F# to G
- Whole step: G to A
- Whole step: A to B
- Whole step: B to C#
- Half step: C# back to D
Playing the D major scale will help you understand its sound and how to use the D chord in different songs.
It connects the chord to a bigger musical context, making it easier for you to create melodies and harmonies.
Fingering Techniques
Getting the right finger placement is key to playing the D chord smoothly.
Proper finger positioning helps prevent unnecessary strain and ensures clear sound production.
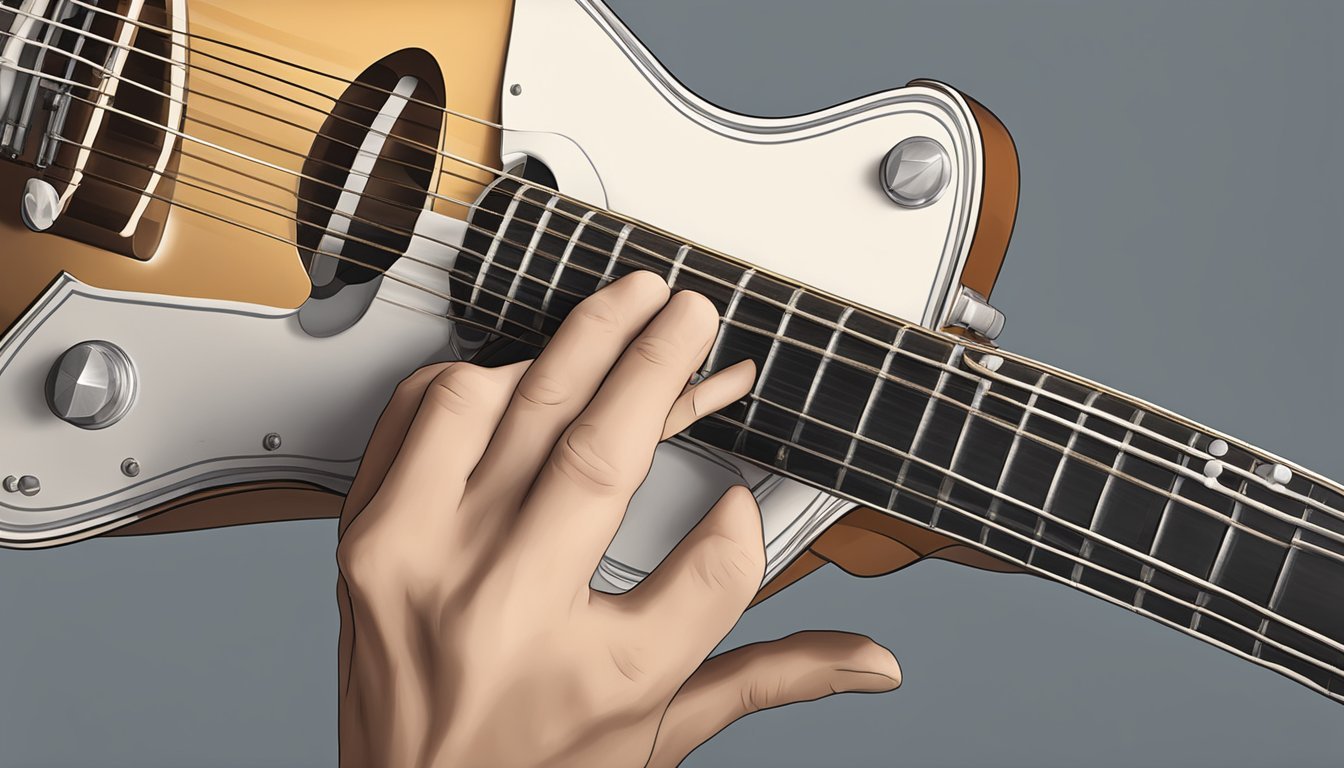
Finger Placement Basics
When playing the D chord, start with your first finger on the 2nd fret of the G string.
This is your 3rd string.
Next, place your second finger on the 2nd fret of the high E string (1st string).
Finally, your third finger goes on the 3rd fret of the B string (2nd string).
It’s important to arch your fingers so they don’t accidentally mute other strings.
Make sure your fingertips are used, not the flat parts.
Keep your thumb positioned behind the neck of the guitar for better reach and control.
Mastering Finger Positions on the Fretboard
As you develop your skills, practice transitioning between the D chord and other chords.
Take the time to ensure your fingers land in the right spots quickly.
Try placing your fingers down one at a time during practice.
This isolates the finger positioning process, making it easier to master.
You might also want to strum only the highest four strings when playing the D chord.
This allows you to focus on getting that clear sound without interference from the other strings.
Regular practice will help you build muscle memory, making it easier to hit those finger positions automatically during play.
Playing the D Chord
Getting the D chord down is essential for playing many songs.
You’ll learn how to strum the open D chord and explore a few variations to spice up your playing.
Strumming the Open D Chord
To strum the open D chord, start by placing your fingers correctly.
Your first finger goes on the 2nd fret of the G string, your second finger on the 2nd fret of the high E string, and your third finger on the 3rd fret of the B string.
Make sure to only strum the first four strings: D, G, B, and high E. Avoid the 5th and 6th strings.
When you strum, use a gentle motion from the wrist.
This helps you maintain control over the chord sound.
Start slowly to feel the chord shape and gradually pick up speed.
You can experiment with different rhythms once you feel comfortable.
Whether you use a pick or your fingers, focus on sounding each note clearly.
Shaping D Chord Variations
Once you have the open D chord mastered, it’s time to explore variations.
Two popular shapes are Dsus2 and Dm.
For the Dsus2 shape, lift your second finger off the E string, leaving the D string open.
This creates a more open sound.
For the Dm chord, you need to adjust your grip.
Keep your first finger where it is, move your second finger to the 3rd fret of the B string, and your third finger to the 3rd fret of the high E string.
Practicing these shapes will add depth to your playing.
You can also try using barre chord shapes later as you advance.
This will open up more possibilities up the neck!
Practical Tips and Songs to Practice
Practicing the D chord can be fun and rewarding.
With some effective techniques and great songs to play, you’ll strengthen your skills in no time.
Practice Techniques
When practicing the D chord, start with proper finger placement.
Your index finger should press down on the 2nd fret of the G string.
The middle finger goes on the 2nd fret of the high E string, while the ring finger is on the 3rd fret of the B string.
Use open strings to enrich your sound.
Strum the D, G, B, and high E strings.
Avoid the 5th and 6th strings, as they can muddy the chord.
Try strumming slowly at first to ensure clarity.
Gradually increase your speed as you feel more comfortable.
Practice switching between the D chord and the D7 chord to get used to finger transitions.
A good chord diagram can help visualize the placements.
Songs Featuring the D Chord
Playing along with songs is a fantastic way to practice.
Many popular tracks feature the D chord, making it a perfect choice.
Ed Sheeran often uses the D chord in his songs.
You might enjoy “Castle on the Hill” for a fun strumming challenge.
Another great pick is “With or Without You” by U2.
It’s simple yet powerful, and it’ll help you get comfortable with the chord.
Pick a song you love and play along.
You can even find tabs or chord sheets online.
This makes it easier to follow along and keeps your practice sessions enjoyable.
As you become more comfortable, consider exploring tutorials that teach you how to play guitar chords for different songs.
This will not only enhance your skills but also introduce you to various styles and techniques.
Remember, the more you practice, the more fun you’ll have, so keep experimenting with different pieces of music!
Frequently Asked Questions
You might have some questions about playing the D chord.
Here are some helpful answers to make your learning process smoother.
What are the finger placements for a D chord on the guitar?
To play the D chord, you need to place your fingers correctly.
Put your first finger on the 2nd fret of the G string.
Next, place your second finger on the 2nd fret of the high E string.
Finally, position your third finger on the 3rd fret of the B string.
Can you break down the D chord into simple steps for beginners?
Sure! Follow these steps for a D chord:
- Place your first finger on the 2nd fret of the G string.
- Put your second finger on the 2nd fret of the high E string.
- Press your third finger on the 3rd fret of the B string.
- Strum the top four strings only.
What variations of the D chord can I play on the guitar?
There are several variations of the D chord.
You can try the Dsus2, Dsus4, or D minor (Dm) chords.
Each variation changes some finger positions but keeps a similar shape.
Could you show me how to play a D chord using guitar tabs?
Sure! Here’s how the D chord looks in tablature format:
e|---2---|  (2nd fret - E string)
B|---3---|  (3rd fret - B string)
G|---2---|  (2nd fret - G string)
D|---0---|  (open D string)
A|-------|  (don't play)
E|-------|  (don't play)
How do I make a D major sound clean and clear on the guitar?
To get a clean sound for the D major chord, make sure each string rings out well.
Press down firmly on the strings with your fingertips.
Strum lightly and only hit the top four strings.
Are there any common mistakes to avoid when playing the D chord?
Yes, some common mistakes include pressing too hard or not enough on the strings.
Also, remember not to strum the A and low E strings.
Make sure you practice to get the finger placements right without muting any strings.